Generating a Metatrader 4 Export
To produce an MT4 historical database export, perform the following steps:
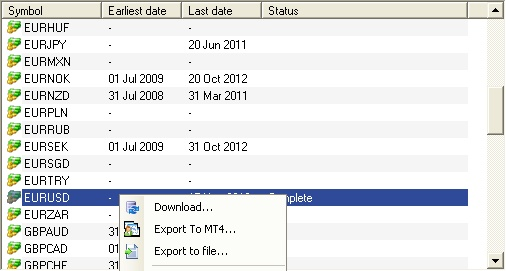
1. Select the instrument(s) you wish to generate an export for and select “Export to MT4”.
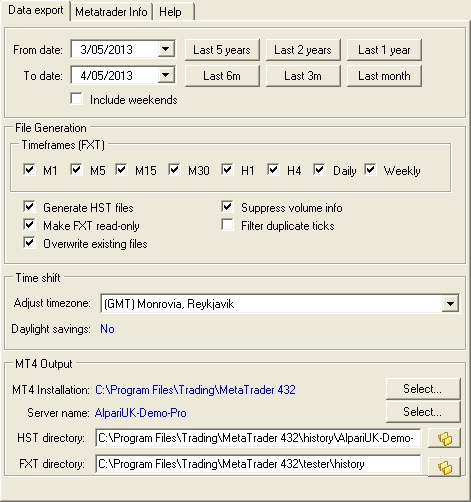
Once you select the MT4 Export option, the settings screen below will show.
2. Select the begin and end date of your export. The system will export all data between these ranges (if its available). You can choose the “quick pick” buttons such as “Last 1 year” to quickly select a date range.
3. By default, your export will only include data from the standard trading hours, excluding the weekends. If you wish to include any available weekend data in your export, check the “Include weekends” box. If there is no trading data for the weekend and you select this option, flat bars will be generated for this period.
4. Select the time frames that you wish to generate the MT4 export files for by checking the appropriate boxes. You will need to export data for those time-frames you wish to back-test in (for example, if you have an EA that uses the 15-minute time-frame, you should select M15). Generally speaking, it is recommended that you generate for all time-frames. If, for reasons of minimising disk-space usage, you wish to only generate specific time-frames you can un-check those that do not apply.
5. Select other options:
- Generate HST will ensure that the Metatrader history files are created. Generally speaking, you should always ensure this option is selected (this feature is for advanced users only).
- Make FXT read-only will ensure that all the exported files are marked as read-only so they cannot be over-written inadvertently.
- Overwrite existing files will ensure that the system does not halt the export in the event files already exist.
- Suppress volume info will cause the export not to output any Volume data.
- Filter duplicate ticks will cause the system to omit exporting any ticks that are the same. A “duplicate” tick is defined as a consecutive tick that occurs in the same minute and has the same quoted price
6. Select the timezone for which all time-stamps will be adjusted to. By default, the time-zone shift is set to 'None' which means that the time will remain in the instrument's native time-zone. The native time-zone can vary for each symbol. For Forex pairs, the native time-zone is usually UTC. By selecting a specific time-zone, you will convert all the time-stamps to that timezone including any daylight-savings (DST) shifts that may be applicable. For example, if you select “EST +7:00 - New York Trading time”, then the all Metatrader charts will be in that time-zone, automatically accounting for any daylight savings changes. See the section on “What MT4 export time-frame should I choose?” for further information on time-zones.
7. Select your Metatrader Installation location. If you have already set this location up in the Metatrader configuration, then it will default automatically to this location.
The system will show you the directories that the HST and FXT will be placed in.
8. Press the OK button. The system will now begin generating the extract and display the percentage complete. NOTE: Make sure your MT4 terminal is not running prior to generating your export otherwise you may an error that the files are “in use” when the export commences.
9. Once the export has completed, you can begin your MT4 back-testing by launching Metatrader.

